Cash on Delivery is still one of the most used payment methods in many markets such as India. Customers who are new to an ecommerce brand often use COD as their payment method for their first order.
When used smartly, the COD can be a great way to boost your order volume and onboard first-time customers into lifelong fans. To minimise the downsides for brands, functionality like COD order verification via WhatsApp can help greatly.
With DelightChat, you can send automated COD order verification messages using the Official WhatsApp API for Shopify stores.
Note: We have released an update where you can automatically convert a confirmed COD Order to Prepaid. Read the help article for more info.
Send COD Order Verification messages via WhatsApp API
If you already have your WhatsApp API access from DelightChat, we can set up your COD order verification automation in just 2 minutes!
Video version:
If you prefer a text + screenshots guide, read on.
Step 1: Open DelightChat
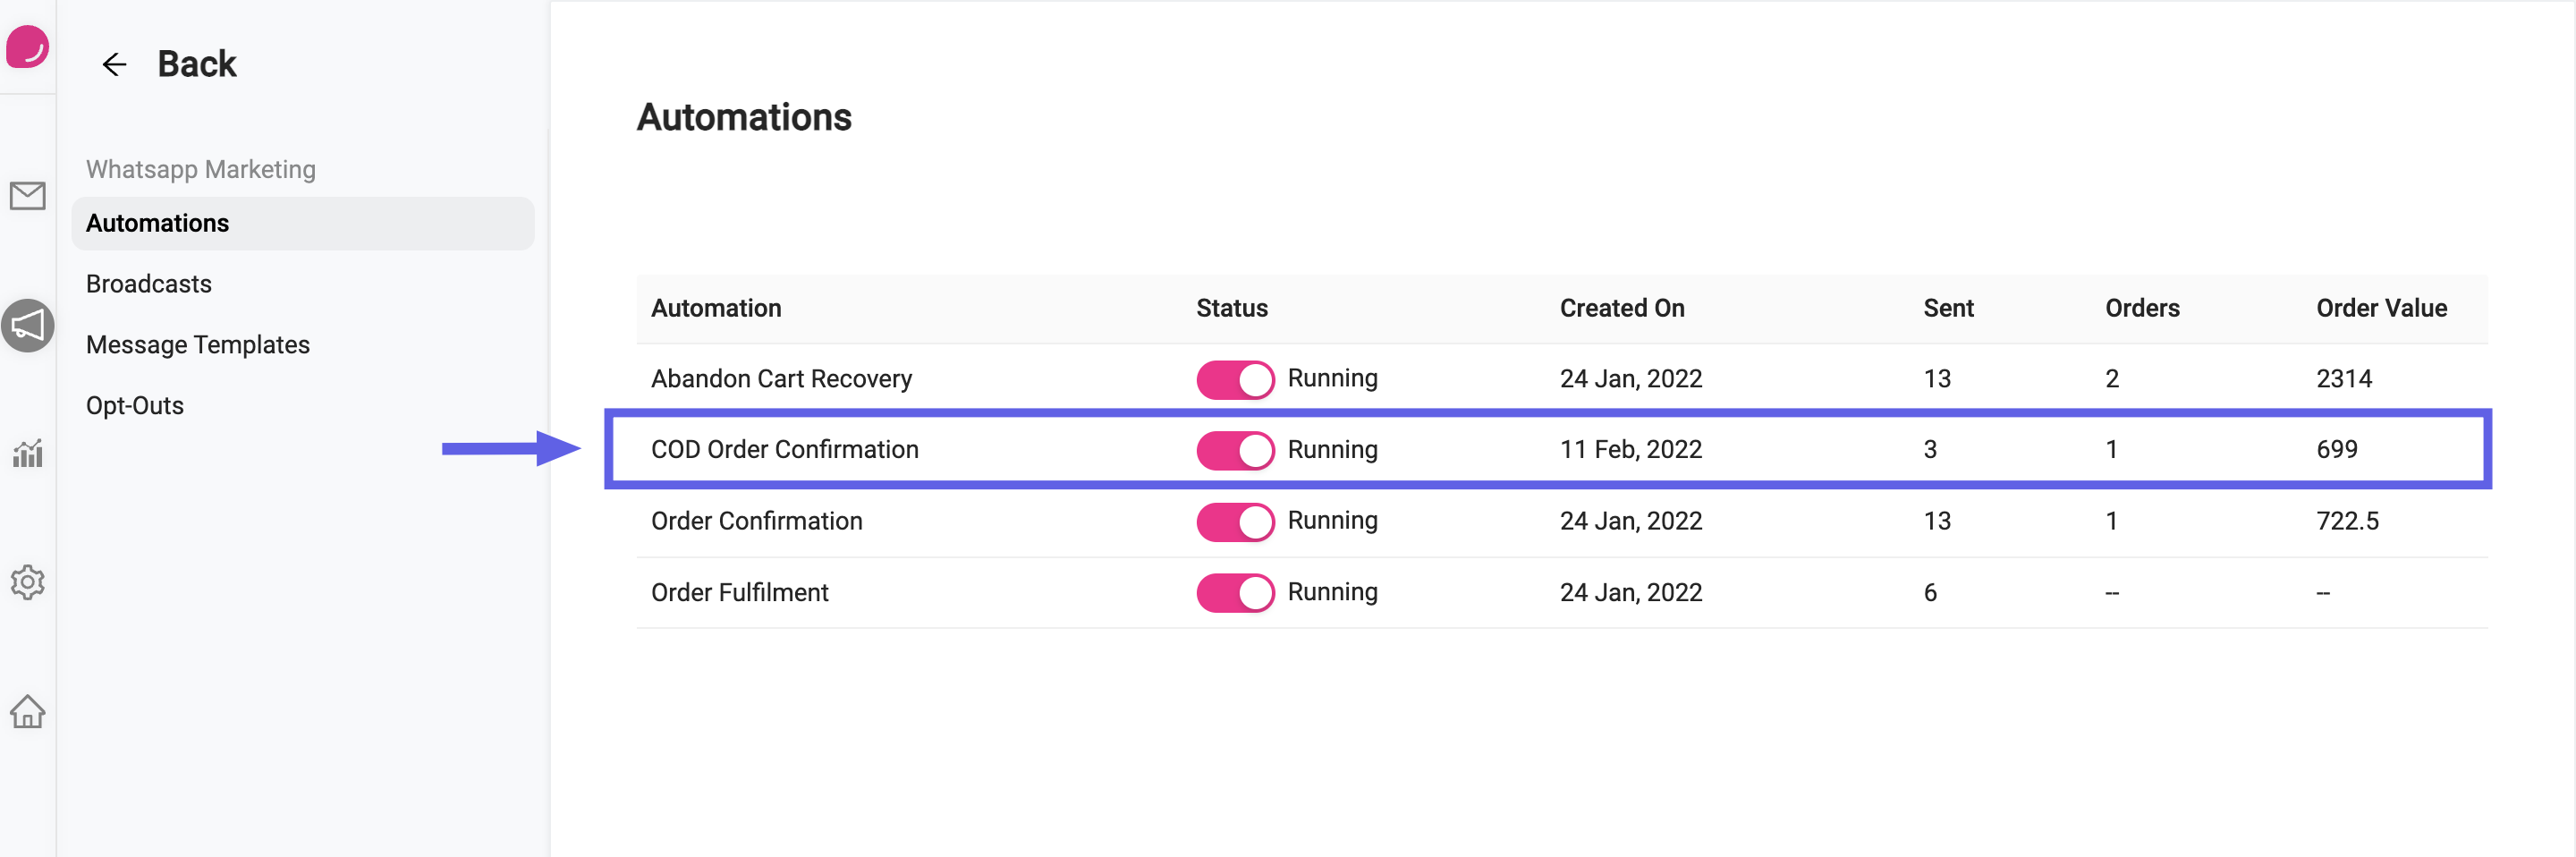
Open WhatsApp Marketing > Automations in the app and select the automation from the list.
Step 2: Configure Message Sending Delay
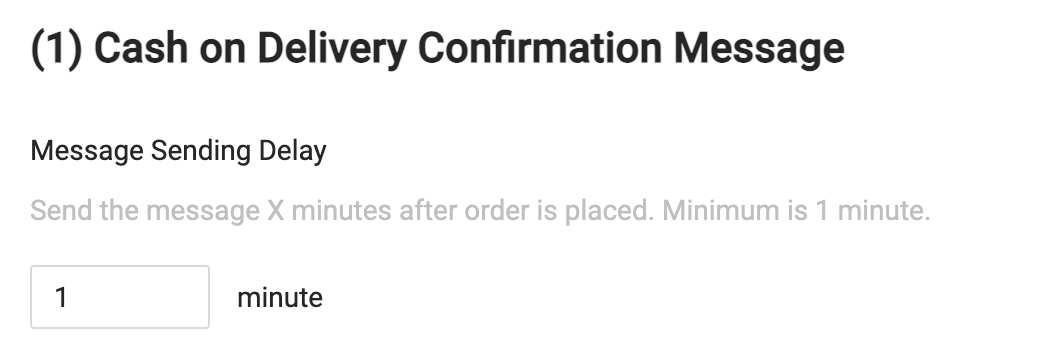
The minimum time to send the COD order verification message is 1 minute.
Step 3: Select Message Template
With DelightChat, you can create WhatsApp message templates according to your requirements, and if they get approved, you can use them anywhere such as the WhatsApp COD Order Verification automation.
Our app also auto-applies default message templates for all our customers, so that you are ready to go as soon as you are live on DelightChat.
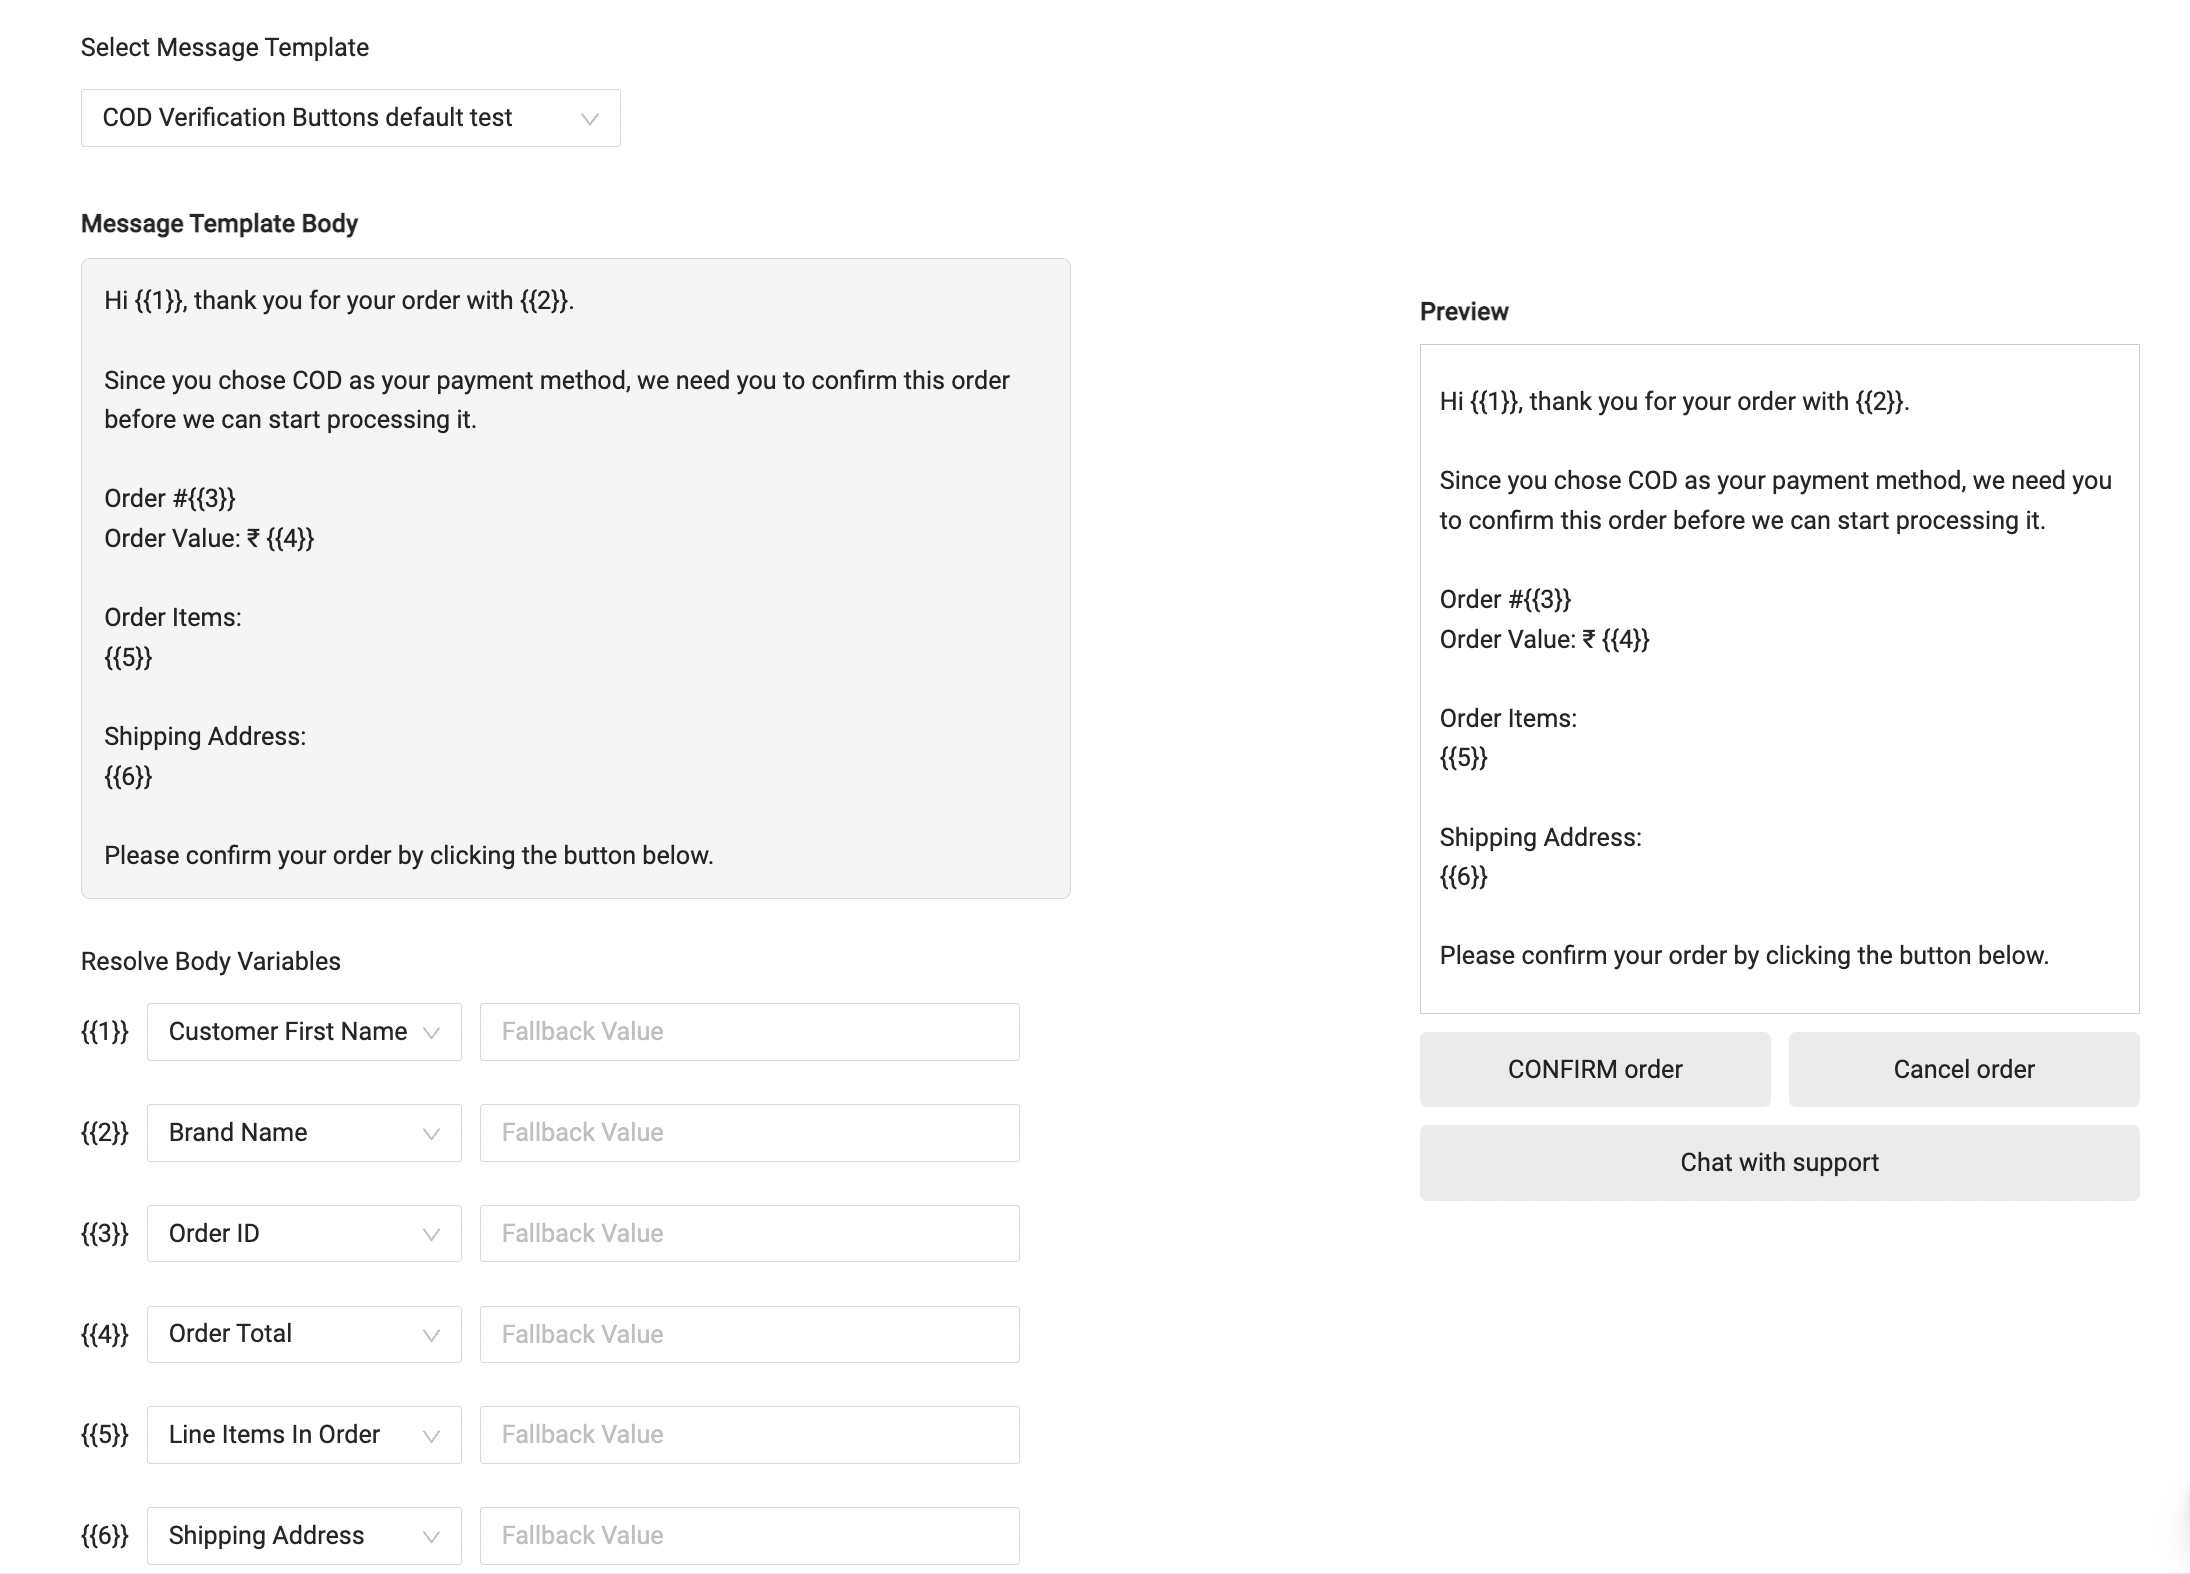
In this example, we have configured the 'COD Verification Buttons' default template.
In this template, we can configure
- Customer's Name to personalise the message
- Order ID & order value
- Line items in the order
- Shipping address
- Quick reply buttons to CONFIRM the order, another to cancel, and finally to chat with support
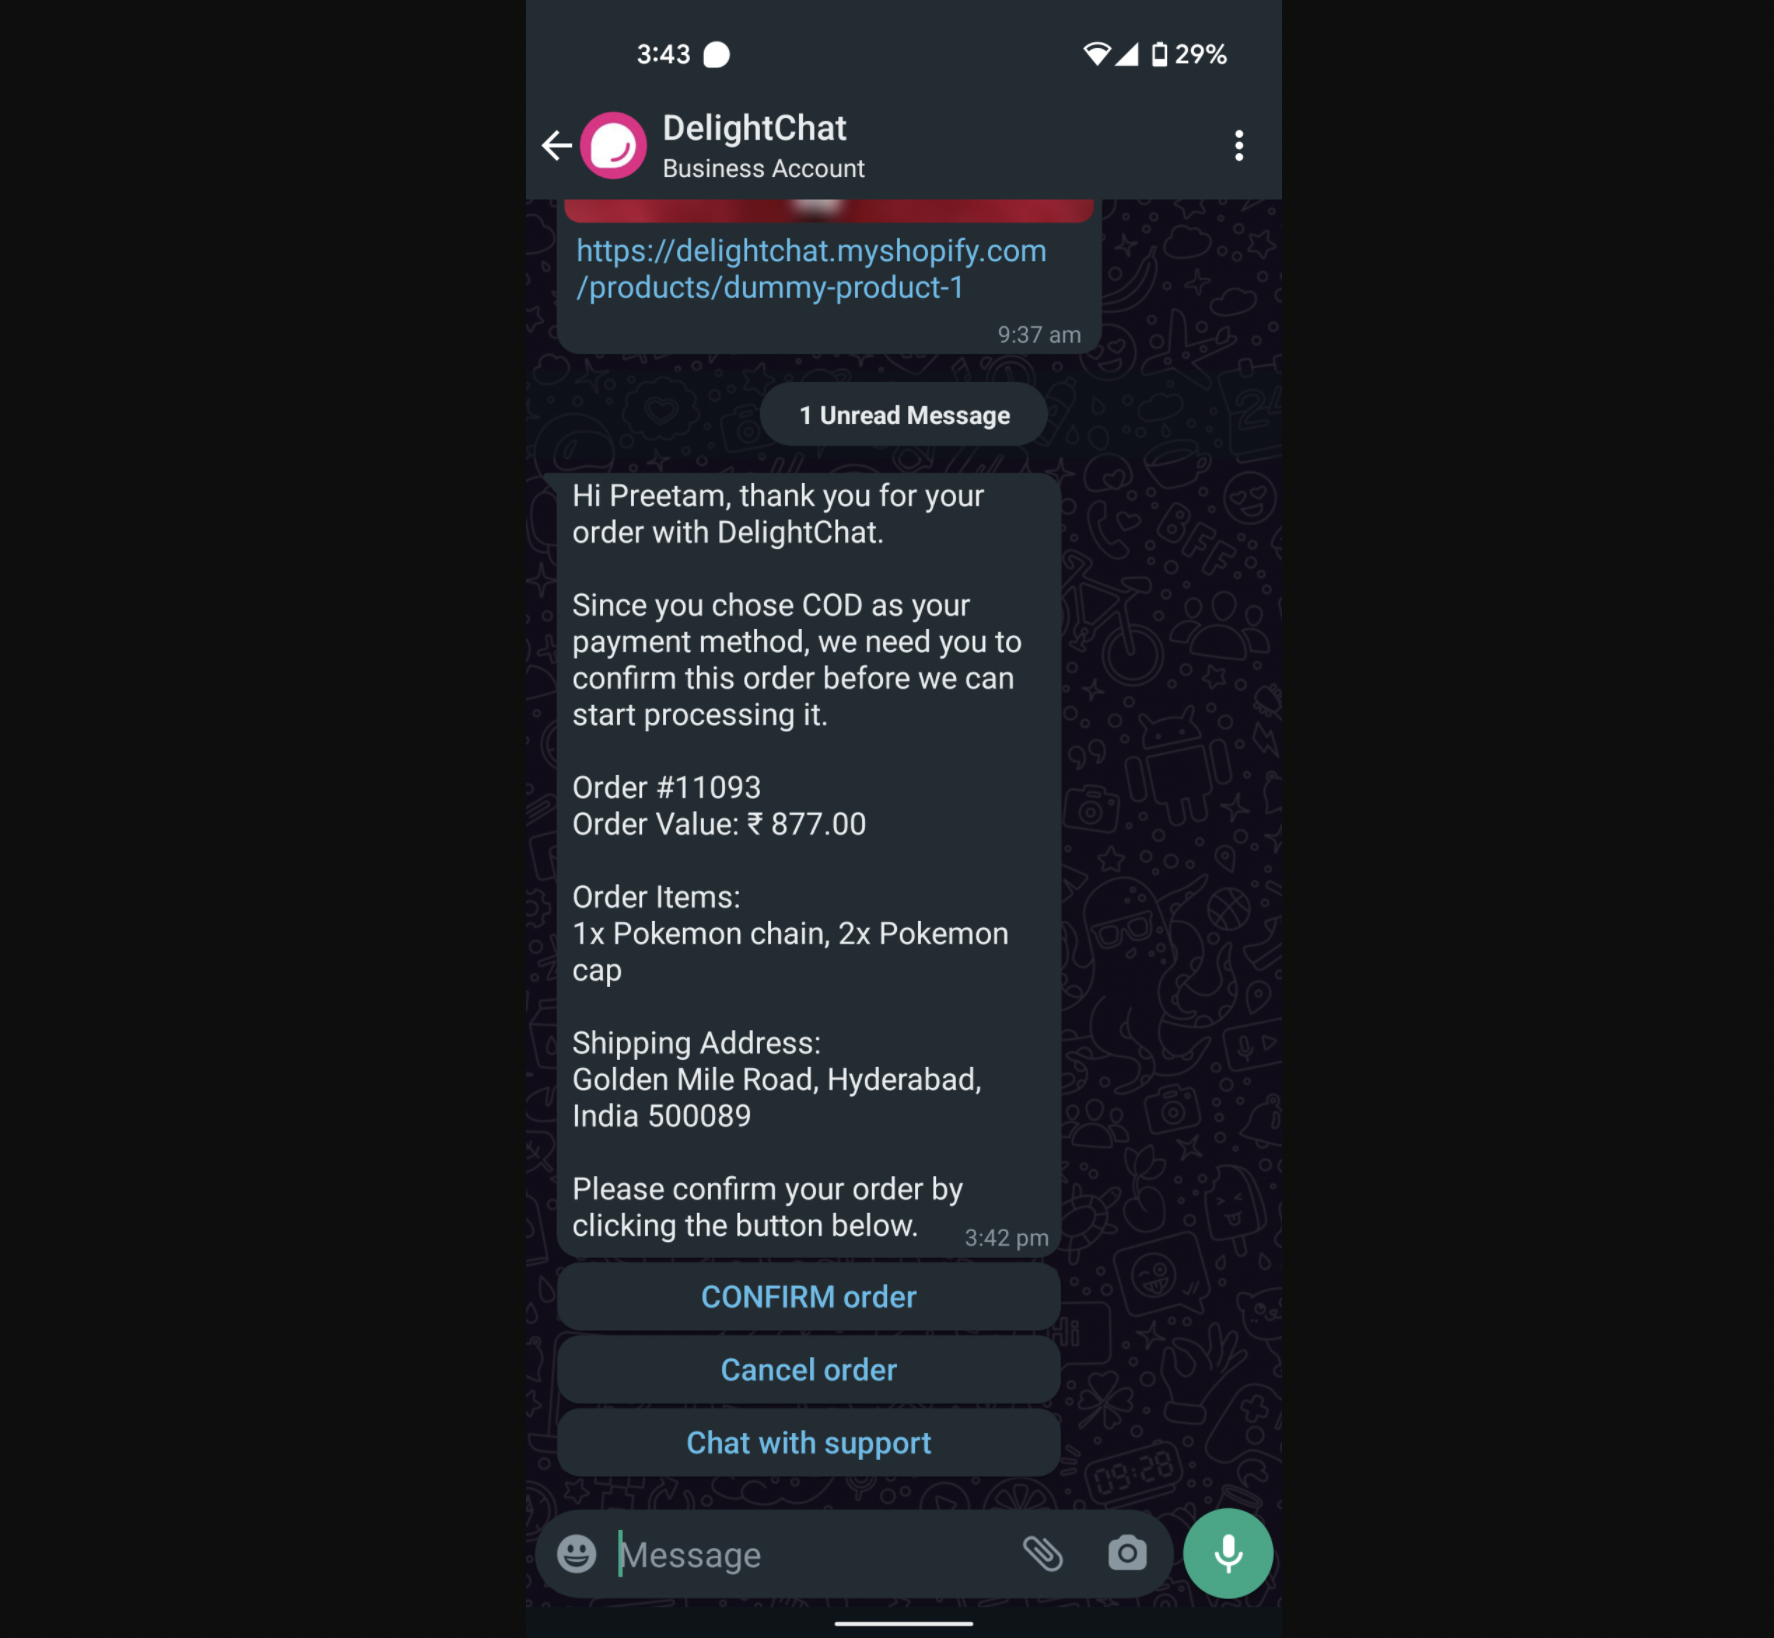
This default template has been crafted in a way to maximise your chances of getting a positive response from your customer.
Please note: If you create a new message template to use with the COD automation, the template requires a minimum of 2 quick reply buttons.
Step 4: Automatically add tags to your order
Based on the response to your COD verification message, DelightChat can automatically add a tag to your order in Shopify.
Configure the exact tag that you want added to your order in case of COD order getting confirmed, cancelled if there has been no response to the message for 24 hours.
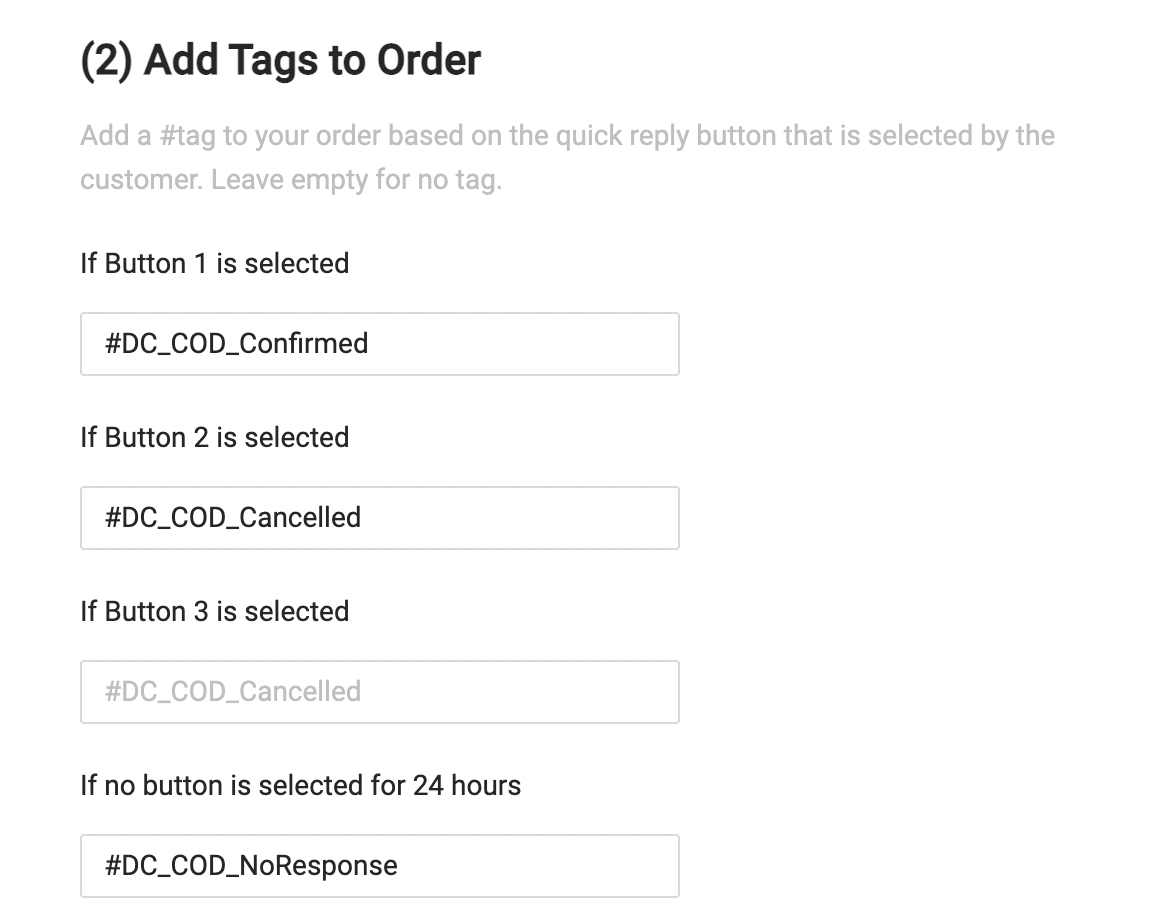
Step 5: Create a support ticket
By default, DelightChat will not create a support ticket if your customer selects one of the quick reply buttons in the WhatsApp message.
However, you may have configured a message template where you do want the customer reply to reach the support inbox. You can configure that in this section by selecting which button response(s) should create a support ticket.
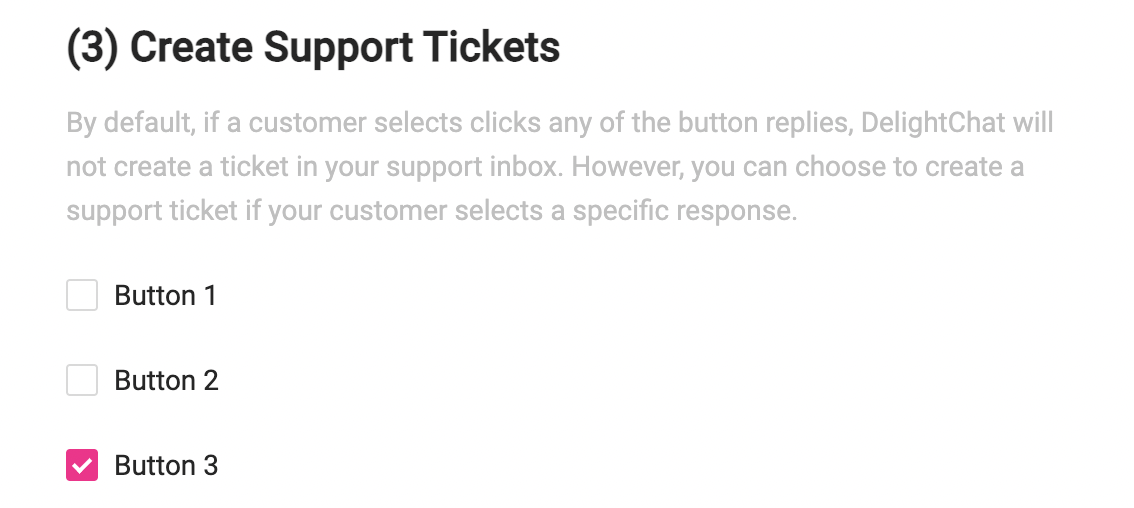
Step 6: Send order confirmation message if COD order gets confirmed (optional)
You might want to send the regular Order Confirmation message if the COD order gets verified. Configure that setting in this section by selecting which quick reply button corresponds to a confirmed order.
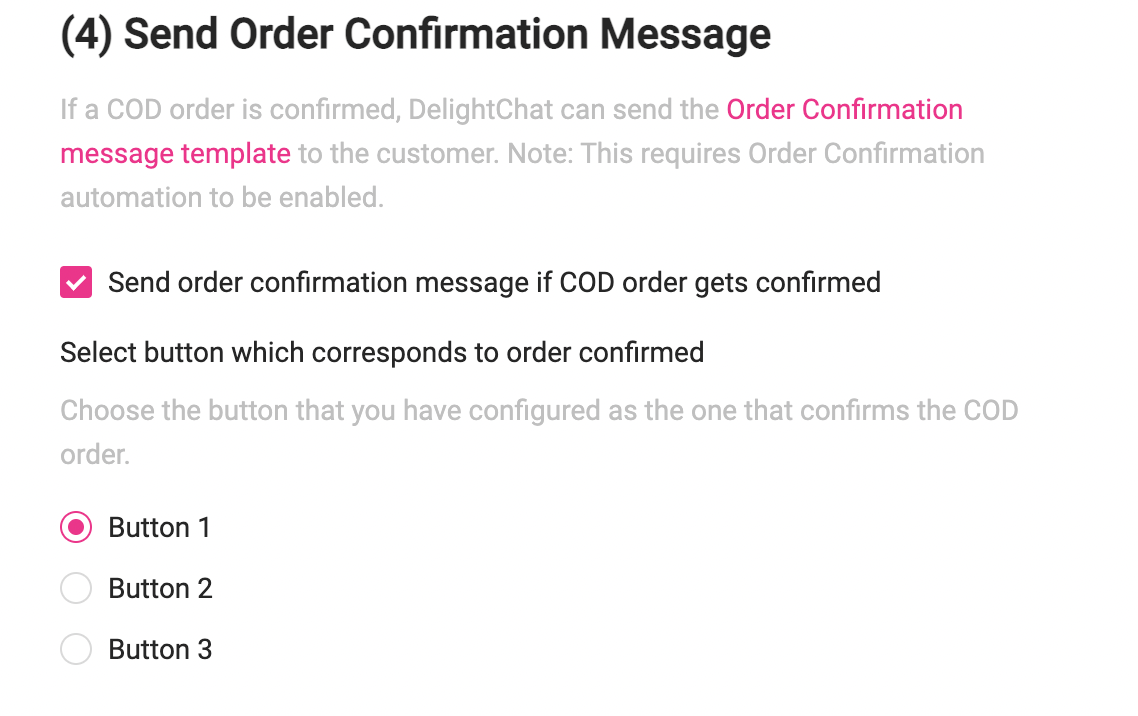
This setting also helps our app to keep track of which orders got confirmed and show that in our analytics (more on that below).
Step 7: Select which button corresponds to order cancelled
This setting helps DelightChat to track orders that got cancelled and show that in our analytics.

Step 8: Enable WhatsApp COD Order Verification Automation
When you're done configuring this automation, just select the Enable toggle and click the [Save] button.

WhatsApp COD Order Verification Analytics
The best ROI this automation can drive is verifying a lot of your cash on delivery orders for you.
DelightChat let's you track the following metrics in analytics:
- Messages successfully sent, delivered, read
- Orders confirmed through the COD automation
- Value of orders confirmed, directly matched with your Shopify store data via the integration
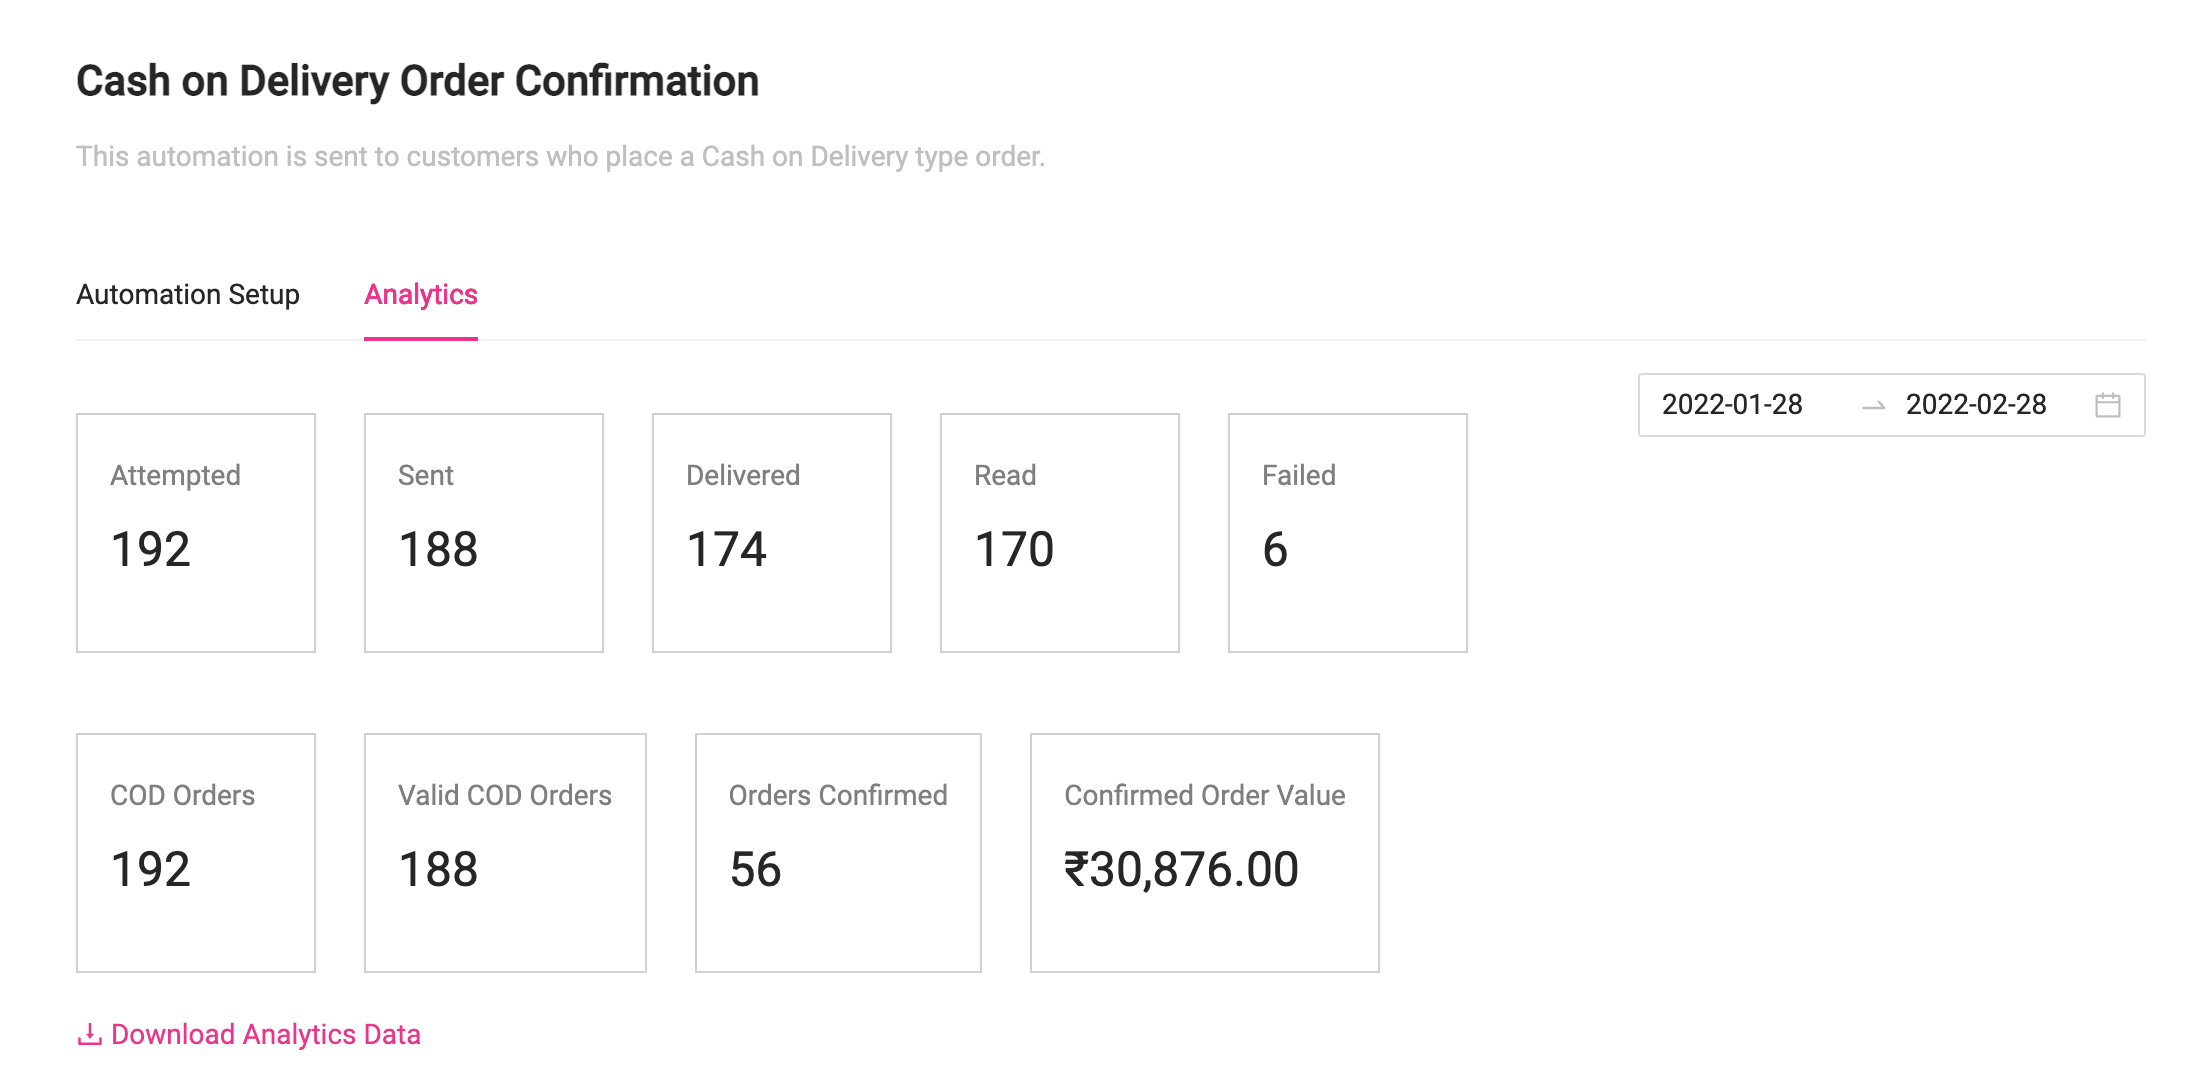
You can also download the analytics data and analyze it further, such as seeing the exact order IDs that got confirmed or cancelled via this automation.
--
New to DelightChat? Let's get you started with sending WhatsApp Order Confirmation messages. Sign up today!
Frequently Asked Questions
▼To address this issue, this automation will be triggered immediately after the customer places a COD order.
This automation sends a message requesting the customer to verify or confirm their order. Only once the order is confirmed do we proceed with fulfillment. This process helps significantly reduce last-minute cancellations
Please choose a template that has an image header. Once the template is selected, you will see the option to either:
1. Upload a static image, or
2. Use a dynamic image.
If you choose to use a dynamic image, there are two options:
1. Product Image:
The system will automatically pick one product image from the order.
For example, if the customer purchased 2–3 products, the system will select any one of those product images and send it as part of the automation message.
2. Items in Cart:
This is a dynamically generated image (screenshot-style) showing all the products in the order, along with their names and prices. It looks similar to the checkout page summary.
Please create a new automation by following these steps:
1. Go to Automation > Create New Automation
2. Select 'Shopify Trigger'
3. Choose 'COD Order' as the event trigger
4. In the entry and exit conditions, you can add all the necessary rules based on your requirements
5. Set a time delay
6. Then configure the automated message you’d like to send
This setup will give you full flexibility for targeting specific products or conditions
However, if you’ve configured a message template where you’d like customer replies to reach the support inbox, you can manage this in the settings by selecting which button response(s) should trigger a support ticket.
If none of the buttons are enabled to create a ticket, you will not receive any notification in the inbox when a customer clicks on them.
For example, if you want to be notified when a customer clicks ‘Chat with Support’, you can enable that button to create a support ticket. This ensures you receive a notification and can promptly respond to the customer.
Troubleshooting Guide
▼2. Test with Sample Orders - Place dummy orders to test the automation.
3. Review Automation Logic - Confirm triggers and conditions are correct
4. Contact Support - If issues persist, we're here to help!
• Fill all required fields:
◦ Variables (name, order ID, amount)
◦ CTA buttons with valid URLs
◦ Coupon codes linked to active promotion.
Template
▼Once the new template is approved, wait for 15 minutes, then update it in the automation.
Common WhatsApp Delivery Issues
▼In this case, please reapply with a new message template, and once approved, update it in the automation.